 |
| Pauline DeMairo Restoration Piece |
| Index | Restoration Page |
 |
| This is the construction part of the LOG that I wrote as I progressed through the restoration. It will be shipped along with the finished piece of marquetry and the old frame. Ernie Mills |
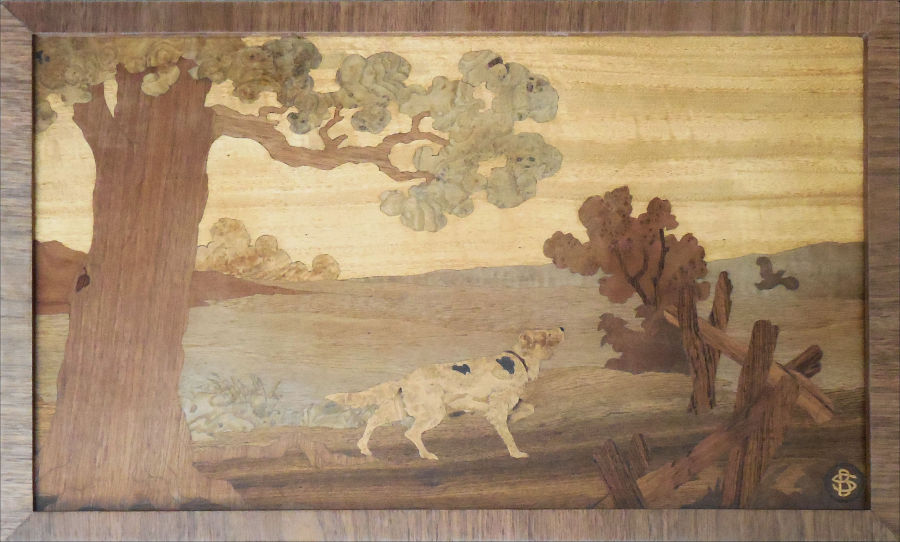
| Relative to the Original this piece is really clean.
The cleaning experience would suggest that the actual picture was coated with a lot of grime either hearth smoke or
cigarette smoke.
I used a small scrapper, a single sided safety razor, to scrape away the grime.
I had to use a combination of Scrapper and sandpaper to clean away what
I think was some type of mold. This can be seen in the tree branch
leaves as a grey whitish area in the foreground. The light spots in the sky just underneath the mold luckily turned out to be superficial and not the substrate showing through as I at first thought. This was cleaned up with scrapping. The scratches on the tree trunk and numerous other places needed a bit of sanding to remove them but that turned out fine. The Frame was in really bad condition and was thrown away although I did return it to the owner. The client wanted a similar cross wise veneer as the original so I improvised with a piece of 3/4" corner molding. This was by far the most time consuming part of this reconstruction. Covering the Corner molding with the Walnut Veneer was a real learning curve. It turns out that even using a scalpel to cut the pieces you had to make sure the enter or top edge of the cut was the one that was displayed because where the knife came out there were tiny flakes coming off that were extremely noticeable. If we had been cutting with the grain this frame would have been finished much earlier. I actually had to take the veneer off the corner molding frame twice before I eventually had a surface that I liked. The veneer was adhered using contact cement. Although difficult and leaving a bad surface to refinish I think it might have been easier than if I had used Titebond ll. Maybe not! Anyway the frame was finished, after 4 coats of sanding sealer and later a couple of coats of Gloss Polyurethane, I put it away for a rest. :-) I then sanded the back up to 600 grit. Applied 5 coats of sanding sealer and after it dried thoroughly I applied two coats of Gloss Polyurethane. Two days later having sanded the front picture also to 600 grit I put 4 coats of sanding sealer and two coats of Satin Polyurethane. This was put aside to dry hard. The Frame and Picture where glued using Titebond ll but I needed to clamp all four corners because the picture was somewhat bowed along the length. After a day setting it turned out that we got lucky yet again and the frame must have corrected the bow. The piece now looks great. We decided to use Gloss on the back and frame but Satin on the picture to stop, what I call the Disney affect. It worked. The whole picture, which is hanging on my wall at present looks very good. Having entered Marquetry pieces in the National Contests in England I soon learned that a good, clean looking hanger at the back is essential. Please check the back view on the restoration web page. See link below. If you try restoration please remember that you are NOT creating this piece of marquetry and whatever amount of work you put into it the end product will only be as good as the Original Artists skill. My thoughts? I am pleased with the results although the marquetry technique of the original is not mine. The amount of detail that was hidden or not easy to see has come out and the whole picture lives again. |
| Index | Restoration Page |