| An
Introduction to Mitered Laminate Designs in Marquetry
by Ernie Mills.
.PDF File
|
The following is my attempt at adapting the
woodworkers build procedures in Laminate Designs to thin veneer,
0.020" Marquetry.
It must be mentioned that the following was done using only a
Scalpel which introduced it's own set of cutting problems but the
bonus was zero kerf.
Written for the woodworker, Laminated Designs in Wood
by Clarence Rannefeld explains this art
form in great detail. It includes techniques, patterns and projects
with in-depth theory and mathematics.
Woodturner PRO is a fantastic piece of software.
It comes in three modules the relevant one to this article is
Lamination PRO. ~
http://woodturnerpro.com/ ~ |
| Every design starts
with a Zig-Zag |
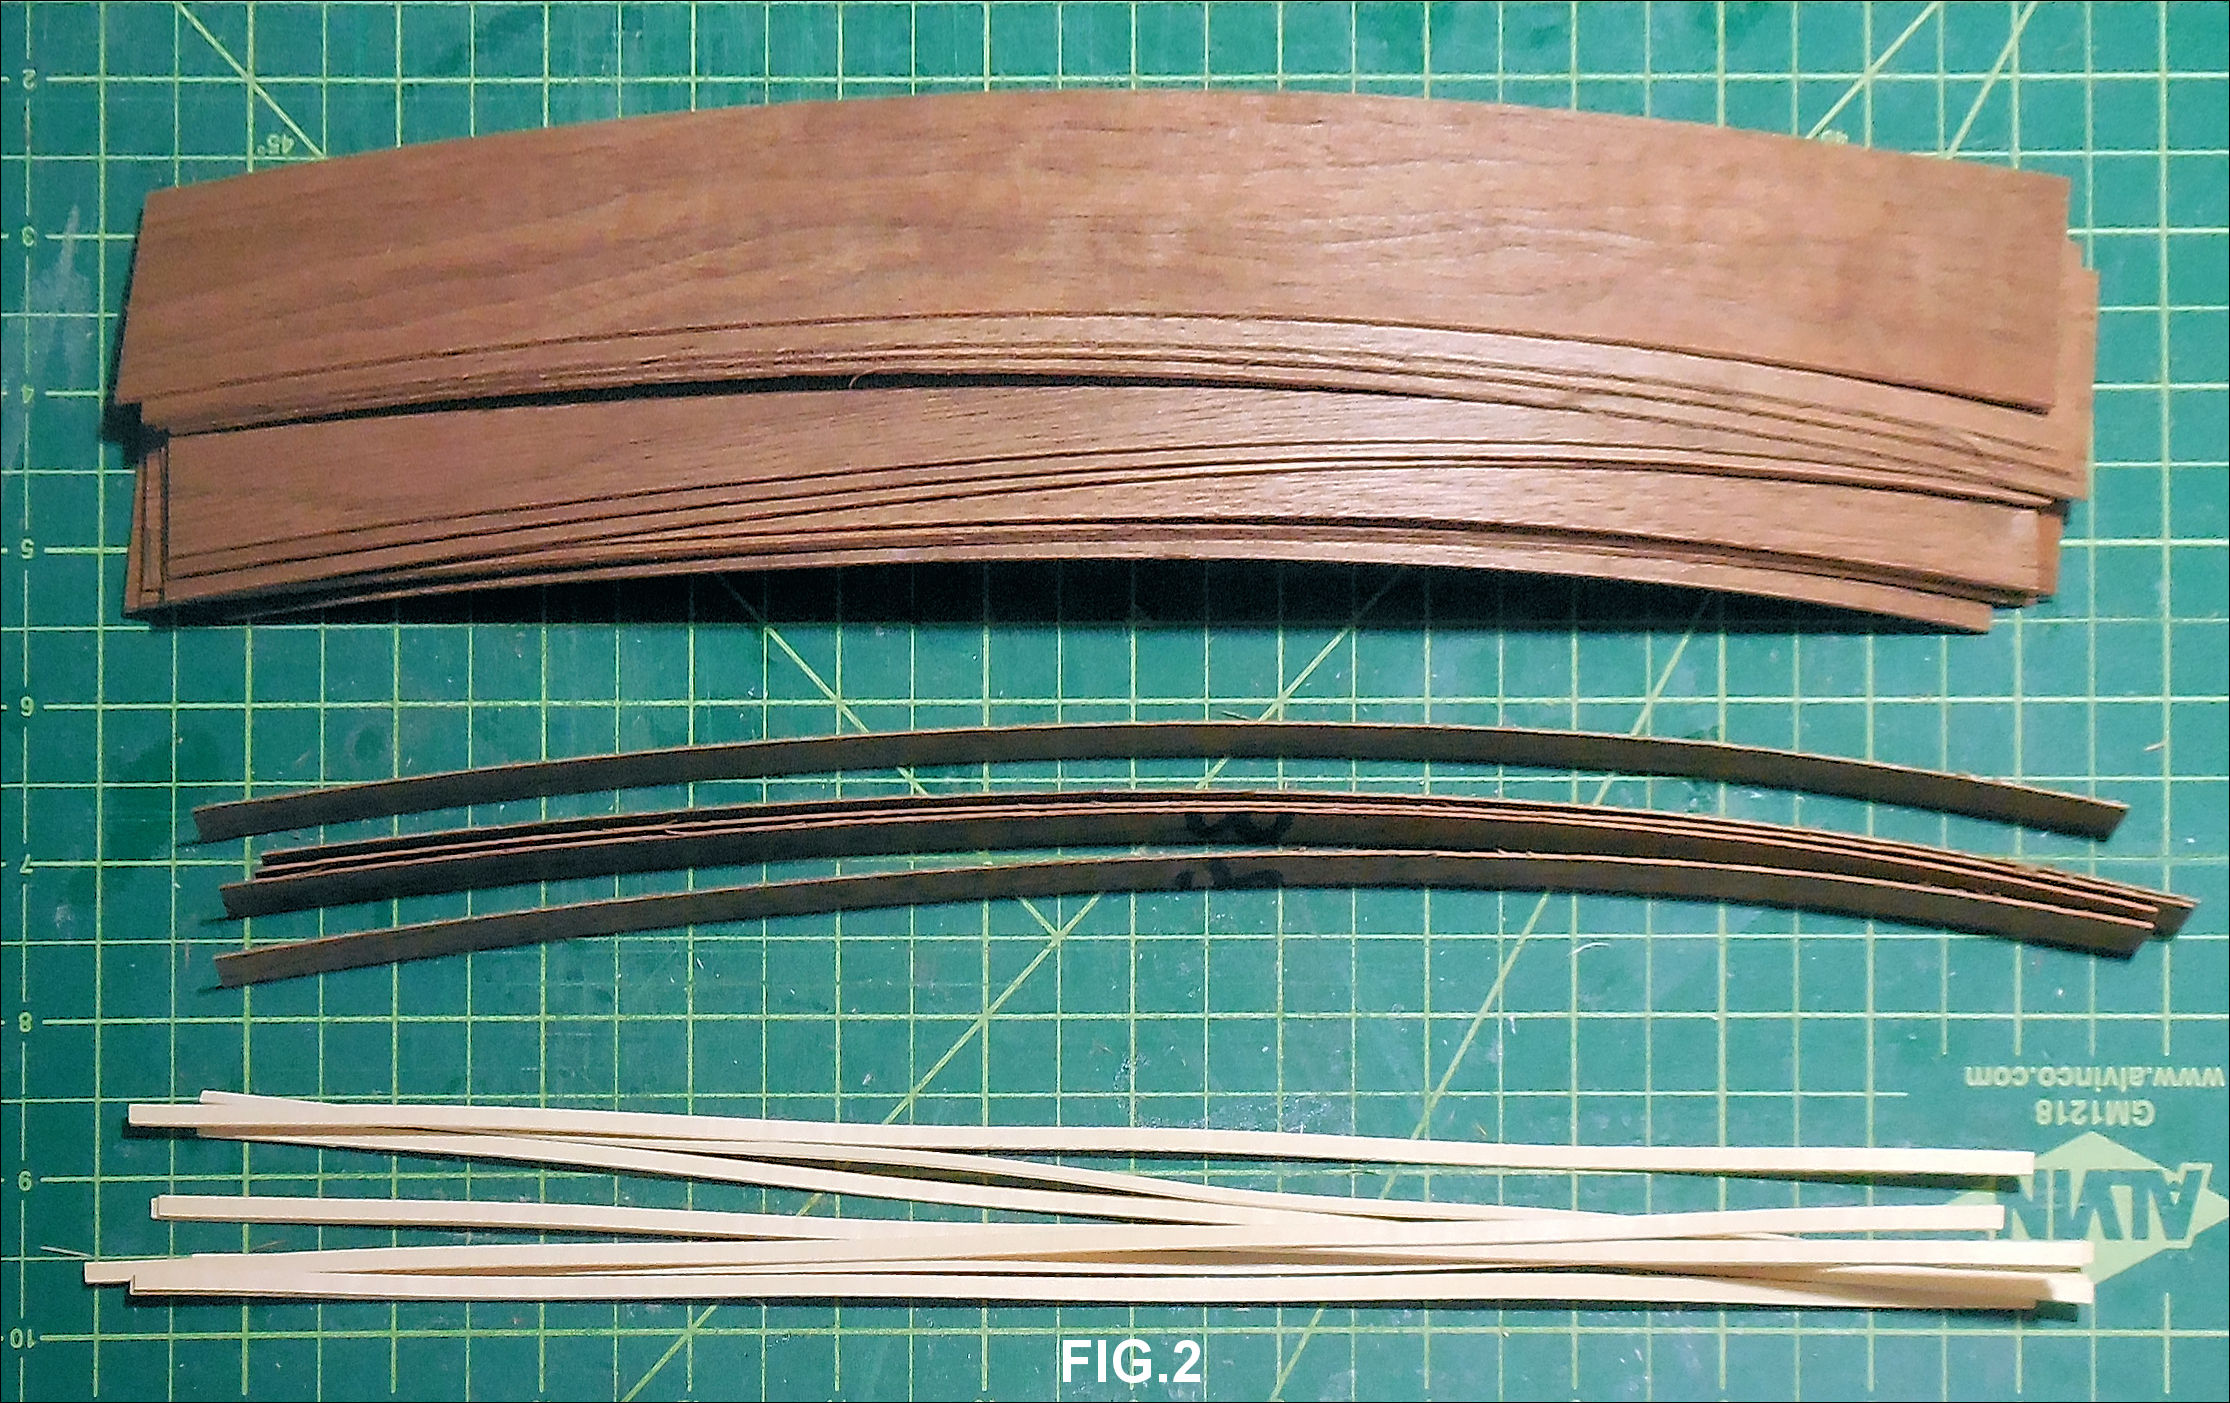
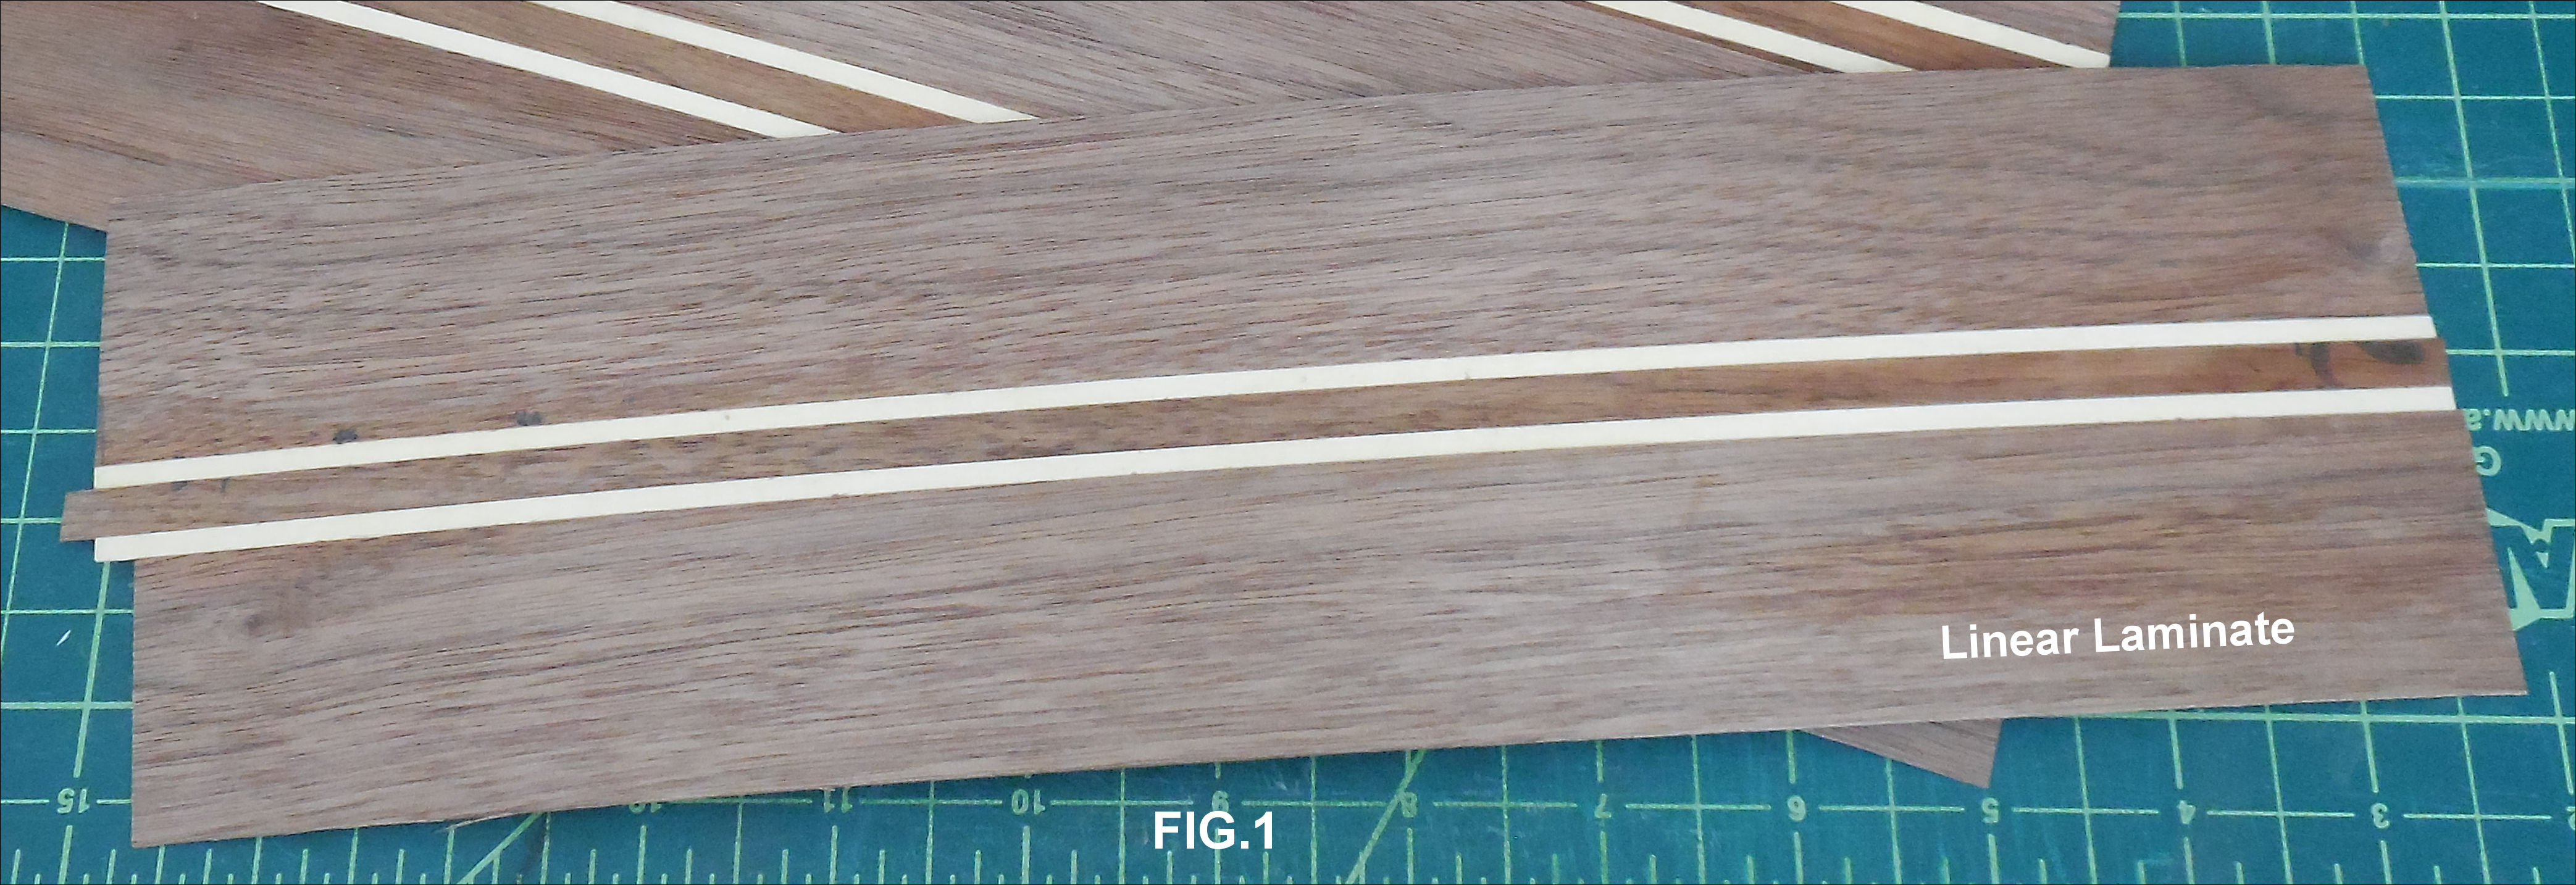
So in my experiments I cut out enough veneer to make 4
Linear Laminates about 18" long.
The center stripe has 3 strips. 1/8" holly, 1/4" walnut and
another 1/8" holly. The outboard planks were 1-1/2" walnut.
Complex designs can include more stripes in the Linear
Laminate. |
 |
 |
| Assembled Linear
Laminate |
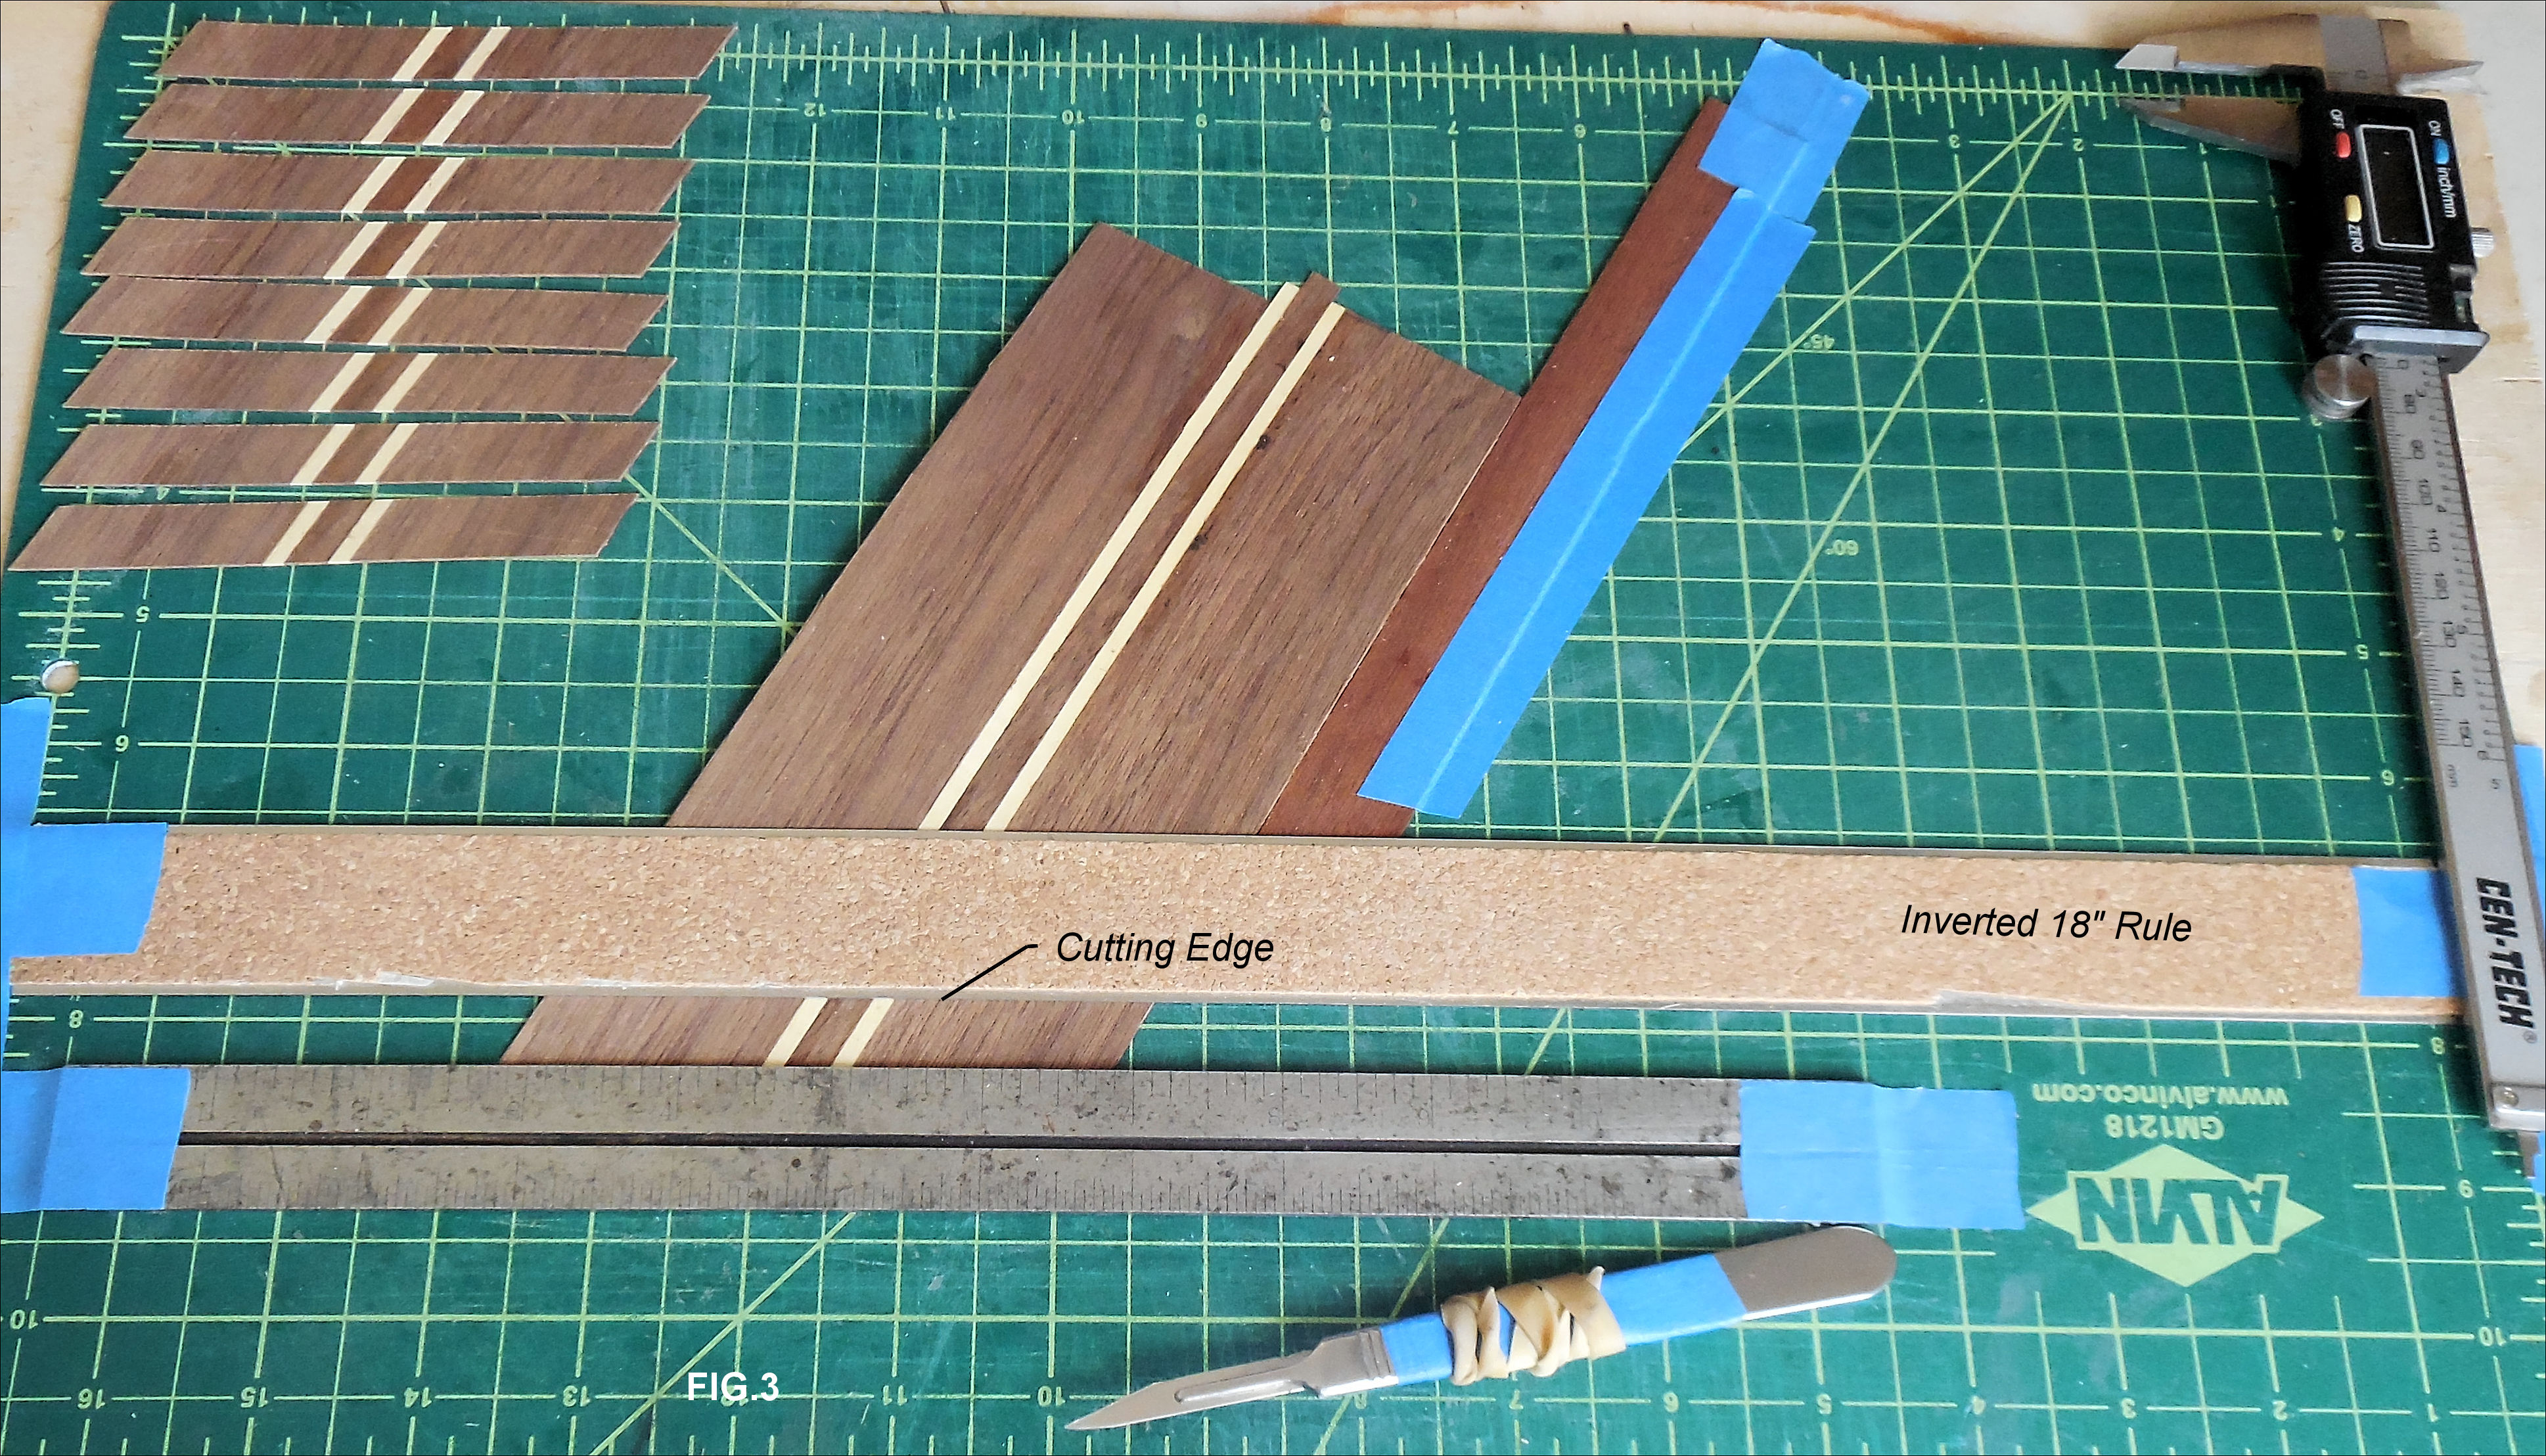
'Standard' stringer cutting to produce these. |
The image below
shows the simple jig for cutting the strips. In this case I
chose 30° to the vertical. The
inverted 18" rule is taped secure
such that the Linear Laminate
being cut slides underneath it. The 12" ruler acts as a stop
and the gap is set for the Laminate Cut Width,
in this case 1/2". I added a piece of veneer to act as a
fence. This is set to 30°. I found that you
really don't need this guide since alignment with the
Stop ruler
seemed to be accurate, however I kept the fence as a double
check. Throughout this whole procedure accuracy is
paramount. My failure, which can be seen on in figures 5, 6
and 7 as heavier cut lines. These were an artifact produced by the blade not being vertical and a "V" is
evident. I got away with it in this example since after
sanding, sealing and varnishing this affect appears to have
disappeared. This was my laziness in not holding the knife
perfectly vertical. My excuse is that this was all
experimental. My next one should be corrected.
OK, after cutting all the strips,
FLIP EVERY OTHER ONE OVER and glue. One thing I
learned was to glue these using cutting board squares as
guides to keep them aligned. That was another mistake I made
and I had to remake whole Linear Laminates. |
 |
| The following image shows the
FIRST GENERATION achieved. The
Zig-Zag |
| OK, again accuracy is paramount in the
assembly of these pieces. I find it easier to assemble the
pairs first but make sure each pair is assembled dead-on.
Any error in the stage before will multiply in further
stages. You might notice on figure 4 that the assembly is
done on a piece of Clear Con-Tact (brand) paper taped down
with the 'sticky' side up. This is
the same technique you use for assembling the Louis Cube
pattern. When assembling the First Generation Laminate
on this paper make sure that the points line up with the
horizontal lines on the Cutting Board and the Vertical
strips are aligned with the Vertical Cutting Board lines,
thus ensuring alignment accuracy. |
 |
| How to MARK where
you need to cut to produce the Second Generation |
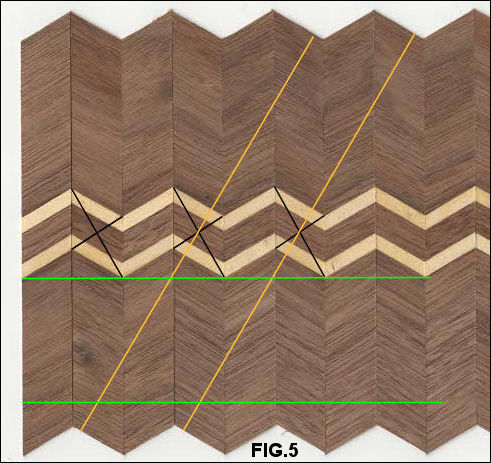 |
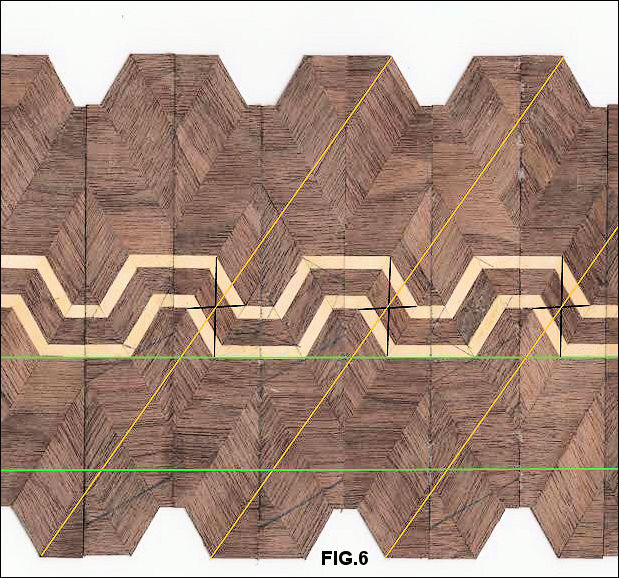
A word before we continue.
At this point you have a choice of cutting all your future
lines through the ASCENDING (A)
Line or the
DESCENDING (D) Line. This makes a
big difference to the final pattern. In my case I decided to
cut through the DESCENDING line.
The method I developed for Marquetry is simple and certainly
easier than the woodworkers who are working in 3/4" stock
with a complex jig.
With a pencil draw the all important Black Lines
to show the centers of the DESCENDING
strips. Where they intersect should be the middle and where
your cut will pass through.
The top green line shows why you needed to glue these strips
using a straight edge. Below that line and parallel to it in
pencil draw another line by using a wide ruler. (shown in
green)
In my case I am going to cut 30°/D
to make the Second Generation.
Simply tape a rule along the bottom line and with a 30°
plastic triangle draw a pencil line as shown in Orange.
Now cut along the these liunes shown in orange.
FLIP EVERY OTHER PIECE and you
will produce your Second Generation Laminate. |
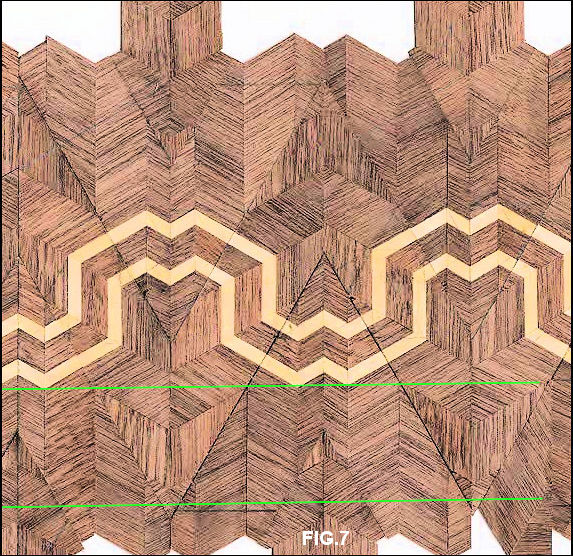
Do the same as the above with each
Laminate
This image shows where to cut the Second
Generation
Laminate to produce your Third Generation
Laminate. |
 |
| |
 |
Congratulations,
you have produced a Third Generation Laminate.
You can of course continue ad infinitum.
OK, A word about Formula and being
able to pass on your pattern to
someone else.
As you know you can choose to cut through the
ASCENDING (A) Line or the
DESCENDING (D) Line, and you can
do this at any angle so there are many combinations and
Patterns.
The formula for this piece is therefore 30/30D/30D
ie cut the Linear Laminate 30°,
the First Generation Laminate 30/D (30°
DESCENDING) and the
Second Generation 30/D
(30° DESCENDING) |
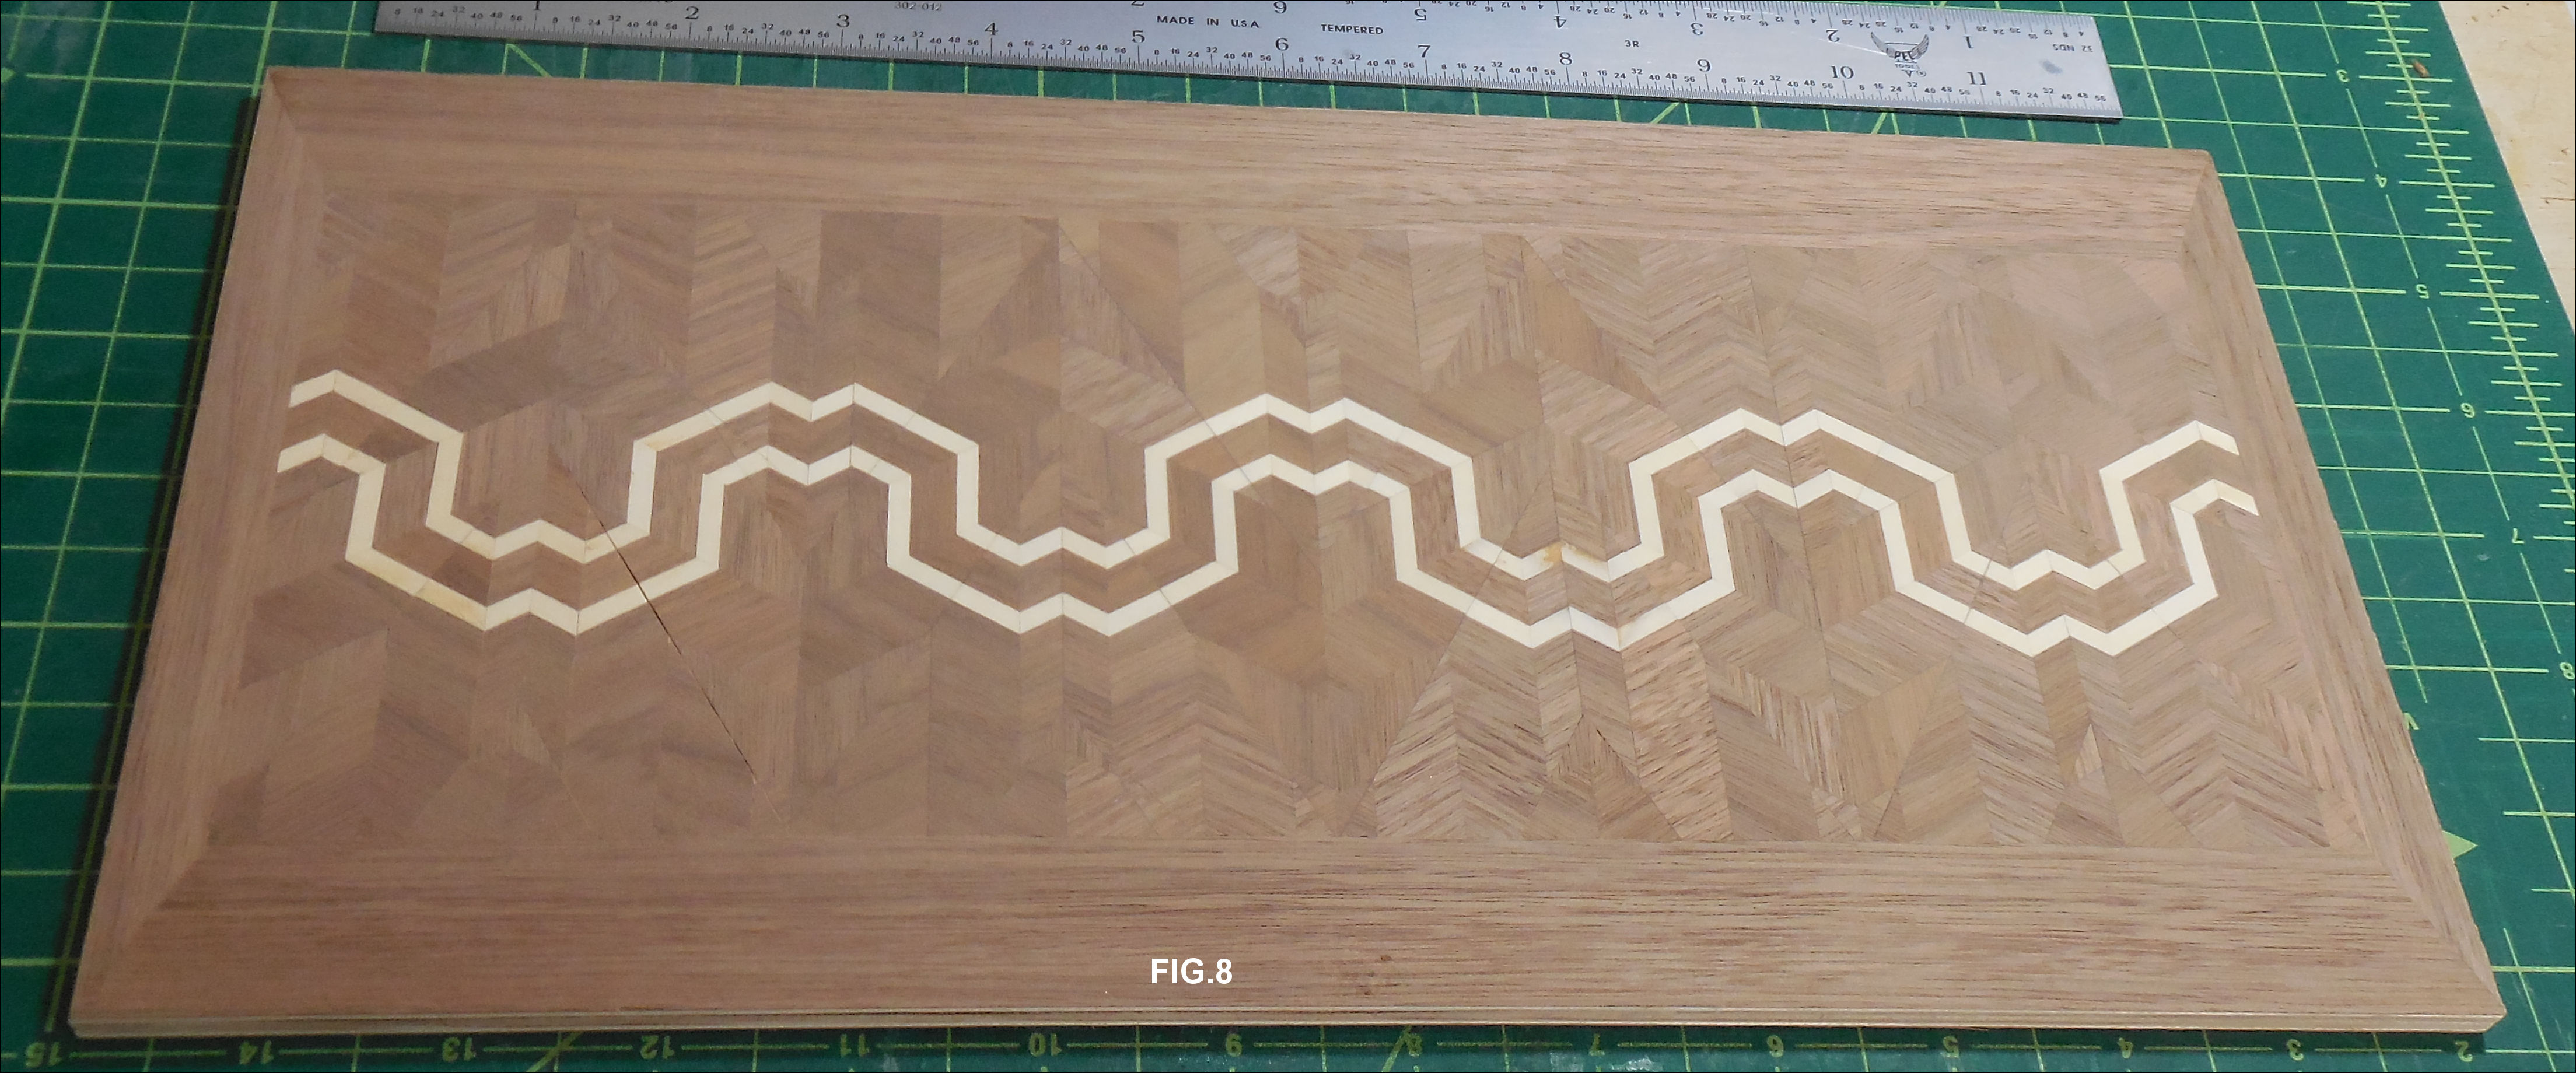
| So! now what do I do with this
Laminate? |
| The image below shows the Laminate with a
normal Marquetry border and
pressed onto a piece of 1/4" MDF.
The backside had a piece of walnut veneer pressed onto it. |
 |
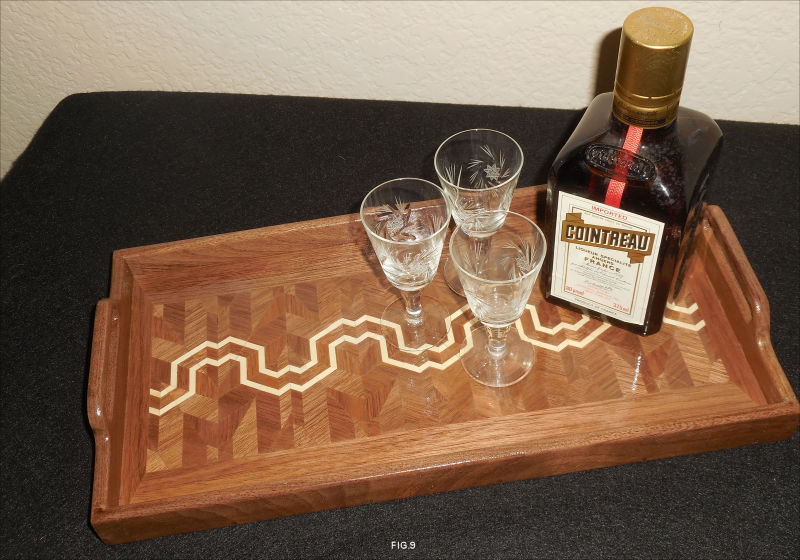
The Tray turned out to be small so I called
it a Liqueur Serving Tray.
I refer you back to the book, Laminated Designs in Wood
shows many applications. A clock, a table and much
more. |
Please note that the Tray was an after thought after working
through this adaptation of Laminated Design for Marquetry
and I would be very interested in receiving and image via
email of your finished work using this technique. I'll add
it to my web site. Enjoy |
 |
|